Welcome to our mouthwatering journey into the art of creating the perfect pavlova! If you’ve ever marveled at the delicate balance of a crisp meringue shell, velvety whipped cream, and luscious fruit toppings, then our Pavlova Recipe is just what you need.
Born in honor of the Russian ballerina Anna Pavlova, this meringue-based dessert combines the lightness of whipped egg whites with the sweetness of sugar. The result is a heavenly treat that will impress your taste buds and captivate your guests.
Join us as we unlock the secrets to creating the perfect pavlova. In this article, we’ll guide you through the step-by-step process, sharing essential tips along the way to ensure your pavlova turns out magnificently every time.
Key Takeaways:
- Discover the art of creating a pavlova with our step-by-step recipe.
- Understand the key elements of a pavlova – meringue, whipped cream, and fruit toppings.
- Learn essential tips to master the pavlova-making process.
- Explore delicious variations for pavlova toppings.
- Discover how to make mini pavlovas for individual servings.
What is a Pavlova?
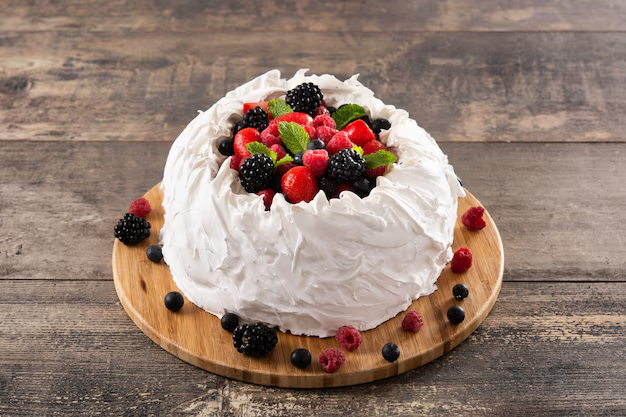
To start, let’s understand what a pavlova is. A pavlova is a meringue-based dessert named after the Russian ballerina Anna Pavlova. It is made from beaten egg whites and sugar, resulting in a crisp and light meringue. The pavlova is typically topped with whipped cream and fruit, creating a delightful combination of textures and flavors.
If you’ve never tasted a pavlova before, imagine biting into a dessert that has a crisp outer shell, but as soon as your fork sinks in, you’re met with a pillowy meringue that dissolves on your tongue. The sweetness of the meringue is balanced perfectly by the creamy whipped cream. Then, the addition of fresh fruit adds a burst of juiciness, creating a delightful contrast of textures.
Traditionally, the pavlova is adorned with berries like strawberries, blueberries, or raspberries. However, you can get creative with the toppings and use any combination of fruits that you prefer. Some popular choices include sliced peaches, kiwi, or even tropical fruits like mango and pineapple.
The pavlova is a dessert that truly captures the essence of elegance and indulgence. With its light and airy meringue base and the heavenly combination of whipped cream and fresh fruit, it has become a favorite among dessert lovers around the world.
Essential Tips for Making the Perfect Pavlova
Achieving the perfect pavlova requires attention to detail. Here are some essential tips to keep in mind:
1. Whipping Cream to the Perfect Peak
When preparing the whipped cream for your pavlova, be sure to whip it until it reaches stiff peaks. This means that when you lift the beaters or whisk, the cream should stand up and hold its shape without drooping. Over-whipping can result in a grainy texture, while under-whipping may cause the cream to deflate.
2. Creating a Crisp, Light Meringue
The key to a crisp pavlova meringue is to beat the egg whites until they are glossy and form stiff peaks. The sugar should be added gradually to ensure it fully dissolves into the mixture, creating a smooth and stable meringue base. Using a mixer or electric whisk can make this process quicker and more effortless.
3. Using Parchment Paper for Easy Release
Line your baking sheet with parchment paper before piping or spreading the pavlova mixture. This will prevent the meringue from sticking to the pan and make it easier to remove the pavlova once it has cooled. The parchment paper also helps to distribute heat evenly for a more consistent bake.
4. Optimal Bake Time and Temperature
Baking the pavlova at a low temperature for a long duration allows it to dry out and develop a crisp exterior while maintaining a marshmallow-like interior. Typically, a pavlova is baked at around 250°F (120°C) for 1.5 to 2 hours. However, every oven is different, so keep an eye on the pavlova and adjust the bake time if necessary.
“The combination of a crisp meringue, luscious whipped cream, and fresh fruit is what makes a pavlova truly irresistible. Attention to key details, such as whipping cream to the perfect peak and achieving a crisp meringue, is essential for creating a flawless pavlova.”

Creating the perfect pavlova requires precision and patience, but the end result is well worth the effort. Follow these essential tips for a show-stopping pavlova that will impress your guests and leave them craving more!
Step-by-Step Pavlova Recipe
Indulge in the divine flavors of a homemade pavlova with our step-by-step recipe. This dessert combines a delicate meringue base with a luscious topping of fresh strawberries, whipped cream, tangy lemon curd, and juicy berries.
Follow these simple steps to make the perfect pavlova:
Ingredients:
- 4 large egg whites
- 1 cup granulated sugar
- 1 teaspoon cornstarch
- 1 teaspoon white vinegar
- 1 cup strawberries, sliced
- 1 cup mixed berries (blueberries, raspberries, blackberries)
- 1 cup whipped cream
- ½ cup lemon curd
Instructions:
- Preheat your oven to 250°F (120°C) and line a baking sheet with parchment paper.
- In a clean mixing bowl, whisk the egg whites using an electric mixer until they form stiff peaks.
- Add the sugar, cornstarch, and vinegar to the egg whites and continue whisking until the mixture is glossy and firm.
- Spoon the meringue mixture onto the prepared baking sheet, shaping it into a round nest with slightly raised edges.
- Bake the pavlova for 1 hour and 30 minutes, or until the outside is crisp and dry.
- Once baked, turn off the oven and let the pavlova cool completely without opening the oven door.
- Once cooled, carefully transfer the pavlova to a serving plate.
- Top the pavlova with a generous amount of whipped cream, followed by the sliced strawberries, mixed berries, and dollops of lemon curd.
- Serve immediately and enjoy!
With its crisp meringue shell and a medley of fresh flavors, this pavlova recipe is sure to impress your guests. The combination of sweet strawberries, tangy lemon curd, and juicy berries creates a delightful explosion of tastes. Add a dollop of whipped cream for a touch of creaminess, and you have a dessert that is both visually stunning and absolutely irresistible!
Tips for Baking and Cooling the Pavlova
The baking and cooling process is crucial to achieving the perfect pavlova. Following these tips will help you achieve that airy, crisp meringue with a soft, marshmallow-like center.
Baking the Pavlova
Once you have piped or spread the pavlova mixture onto a parchment-lined baking sheet, it’s time to pop it into the oven. Preheat the oven to 325°F (160°C) and place the pavlova on the lower rack for even heat distribution. This will ensure that your pavlova bakes evenly and doesn’t brown too quickly.

- Open the oven: After 15 minutes of baking, open the oven door briefly to release any moisture that may have accumulated. This will help prevent the pavlova from becoming soggy.
- Turn the oven: After opening the oven, reduce the temperature to 200°F (95°C) and continue baking for another 45 minutes to an hour. This low and slow baking technique will ensure the meringue is cooked through while maintaining its delicate texture.
Cooling the Pavlova
Once the pavlova is fully baked, it’s time to let it cool. Cooling the pavlova properly is key to achieving that perfect combination of crisp outer shell and soft interior.
- Let it cool: After the baking time is complete, turn off the oven and simply let the pavlova cool in the oven. Avoid opening the oven door during this cooling phase, as the rapid change in temperature can cause the pavlova to collapse.
- Open the oven door: After about an hour of cooling, you can open the oven door slightly, allowing the pavlova to gradually cool to room temperature. This step helps prevent any residual heat from causing the pavlova to become overly chewy.
Remember, patience is key when it comes to baking and cooling pavlova. Taking the time to follow these tips will ensure a pavlova that is both visually stunning and absolutely delicious.
Variation Ideas for Pavlova Toppings
While whipped cream and fruit are classic toppings for pavlovas, there are endless variations to experiment with. Here are some ideas:
-
Nutty Delight
Top your pavlova with a generous dollop of whipped cream and a medley of fresh fruits, such as strawberries and blueberries. Sprinkle chopped nuts, such as almonds or pistachios, over the cream for an added crunch.
-
Zesty Lemon
Create a tangy twist by adding a layer of lemon curd over the pavlova base. Top it off with a generous amount of whipped cream and garnish with thinly sliced lemon zest for an extra pop of flavor.
-
Tropical Paradise
Transport your tastebuds to a tropical getaway by topping your pavlova with a combination of fresh fruits like mangoes, pineapple, and kiwi. Finish it off with a drizzle of coconut cream and a sprinkle of toasted coconut flakes.
-
Berrylicious
Indulge in a berry explosion by layering your pavlova with a mix of fresh berries, such as strawberries, raspberries, and blueberries. Add a touch of sweetness with a dusting of powdered sugar.
-
Decadent Chocolate
Elevate your pavlova to new levels of indulgence by adding a layer of rich chocolate ganache over the meringue base. Top it with whipped cream and garnish with chocolate shavings for a luxurious treat.
-
Exotic Spice
Infuse your pavlova with warm and aromatic flavors by adding a sprinkle of ground cinnamon, nutmeg, or cardamom to the meringue. Top it with whipped cream and garnish with a sprinkle of cocoa powder for a delightful twist.
With these creative topping ideas, you can customize your pavlova to suit your taste preferences and impress your guests with a visually stunning dessert.
Mini Pavlovas for Individual Servings
If you prefer individual servings, you can make mini pavlovas. This delightful variation allows each person to enjoy their own personal pavlova, creating a charming and visually appealing dessert spread. Making mini pavlovas is easy and adds a touch of elegance to any gathering.
To make mini pavlovas, start by preparing the pavlova base. Follow the same steps as with a standard-sized pavlova, but instead of shaping it into one large meringue, divide the base into smaller portions. Use a spoon or a piping bag to shape the portions into individual nest-like structures.
Place the mini pavlovas on parchment-lined baking trays and bake them at the same low temperature as a regular pavlova. The extended baking time ensures that the mini pavlovas develop a crisp exterior while the interior remains fluffy and light.
Once the mini pavlovas are baked and have cooled completely, the fun part begins: adding the toppings. Feel free to get creative with your mini pavlovas. You can use the same toppings as you would with a regular pavlova, such as whipped cream and fresh berries. Alternatively, you can experiment with different flavor combinations by incorporating unique fruit compotes, chocolate drizzles, or even citrus curds.
With mini pavlovas, each serving becomes an individual masterpiece, allowing your guests to indulge in their own personalized dessert experience. Whether you’re hosting a dinner party, celebrating a special occasion, or simply treating yourself, these mini pavlovas are sure to impress.
Tips for Troubleshooting Pavlova Problems
Sometimes, the process of making a pavlova doesn’t go as smoothly as planned. Don’t fret! We’ve compiled a list of common issues and their solutions to help you troubleshoot any problems that may arise.
Pavlova doesn’t hold its shape
If your pavlova doesn’t hold its shape and collapses or spreads, it could be due to a few reasons:
- The egg whites may not have been whipped to stiff peaks. Make sure to beat them until they are thick and glossy.
- There may be leftover egg yolk in the mixture. Even a small amount of yolk can prevent the egg whites from whipping properly. Separate the eggs carefully, ensuring no yolk gets into the whites.
- The oven temperature might not have been low enough. Check that your oven is set to the correct temperature and avoid opening the oven door while baking.
If your pavlova doesn’t hold its shape, don’t worry! Turn it into a delicious pavlova Eton mess by crumbling the meringue and mixing it with whipped cream and fruit.
Pavlova cools and becomes sticky
If your pavlova sticks to the parchment paper or becomes sticky after cooling, it might be due to the following factors:
- The pavlova was not baked long enough. Make sure to follow the recommended bake time and check for a crisp outer shell.
- The pavlova was not cooled properly. Allow the pavlova to cool completely in the oven with the door slightly ajar before removing it.
- Humidity in the environment can cause the pavlova to become sticky. Try to store the pavlova in a dry place or serve immediately.
If your pavlova starts to become sticky, you can try placing it back in the oven for a short time to dry it out further.
Also Read:- Boost Your Health: Discover The Best Sources Of Vitamin C
Leftover egg yolks and what to do with them
After separating the eggs for the pavlova recipe, you may find yourself with leftover egg yolks. Don’t let them go to waste! Here are a few ideas for using them:
- Make a rich and creamy custard or pastry cream.
- Create a homemade lemon curd to serve with your pavlova.
- Whisk them into scrambled eggs for a yolky and indulgent breakfast.
- Add them to homemade mayonnaise or aioli for extra richness.
Get creative in the kitchen and experiment with different recipes to make the most of your leftover egg yolks.
Pavlova cake variations
If you’re looking to take your pavlova to the next level, consider making a pavlova cake! Here’s how:
| Pavlova Cake Variation | Description |
|---|---|
| Pavlova Layer Cake | A towering pavlova cake made by layering multiple pavlova discs with whipped cream and fruit. |
| Pavlova Roll Cake | A rolled pavlova filled with whipped cream and fruit for an elegant dessert. |
| Pavlova Ice Cream Cake | A frozen pavlova cake with layers of meringue, ice cream, and fruit, perfect for hot summer days. |
These pavlova cake variations offer a stunning presentation and are sure to impress your guests.
With these troubleshooting tips and creative variations, you’ll be on your way to mastering the art of pavlova. Remember, practice makes perfect, and even a “failed” pavlova can still be transformed into a delicious dessert. Happy baking!
Conclusion
By following our detailed Pavlova Recipe and incorporating our expert tips, you can confidently create a perfect pavlova every time. Whether you choose to stick with a classic recipe or experiment with different toppings and variations, the result will be a delightful dessert with a crisp meringue and a harmonious blend of flavors.
If you’re looking for visual guidance, you can also check out our Pavlova Recipe Video, which provides step-by-step instructions to help you along the way. It’s a helpful resource for both beginners and experienced bakers looking to perfect their pavlova-making skills.
From hosting a dinner party to enjoying a special homemade treat, our pavlova recipe guarantees a delightful experience. With its light and airy meringue base, topped with luscious whipped cream and your favorite fresh fruits or tangy lemon curd, a homemade pavlova is sure to impress your guests or satisfy your sweet cravings.
FAQs
What is a pavlova?
A pavlova is a meringue-based dessert named after the Russian ballerina Anna Pavlova. It is made from beaten egg whites and sugar, resulting in a crisp and light meringue. The pavlova is typically topped with whipped cream and fruit.
What are some essential tips for making the perfect pavlova?
Here are some essential tips for making the perfect pavlova:
– Use room temperature egg whites.
– Make sure your egg whites and mixing bowl are free from any traces of oil or fat.
– Whip the egg whites until stiff peaks form.
– Gradually add sugar and cream of tartar while whipping.
– Bake the pavlova on a baking sheet lined with parchment paper.
– Bake at a low temperature for a longer time to ensure the meringue is crisp on the outside and soft on the inside.
How do I make a pavlova using your recipe?
Follow these steps to make a pavlova using our recipe:
1. Preheat the oven and line a large baking sheet with parchment paper.
2. In a clean mixing bowl, whisk 6 egg whites until soft peaks form.
3. Gradually add sugar and a pinch of cream of tartar while continuing to whisk until stiff peaks form.
4. Spoon the meringue onto the prepared baking sheet, shaping it into a nest-like form.
5. Bake the pavlova in the preheated oven for the specified time, until it is crisp on the outside and slightly marshmallow-like on the inside.
6. Turn off the oven and let the pavlova cool completely inside with the oven door slightly ajar.
7. Once cooled, carefully transfer the pavlova to a serving plate.
8. Top the pavlova with whipped cream and your choice of fruits or other toppings.
Can I make mini pavlovas?
Yes, you can make mini pavlovas by dividing the pavlova base into smaller portions and shaping them into individual nests. Bake them at the same low temperature until crisp, and then top them with your desired toppings.
What are some ideas for pavlova toppings?
While whipped cream and fruit are classic toppings for pavlovas, you can also try other variations such as:
– Lemon curd and fresh berries
– Cream and mixed berries
– Whipped cream and diced strawberries
– Mango and passionfruit
– Chocolate shavings and caramel sauce
– Coconut cream and tropical fruits
My pavlova didn’t turn out as expected. What could have gone wrong?
There are a few possible reasons why your pavlova may not have turned out as expected:
– The egg whites may not have been whipped to stiff peaks. Make sure to whip them thoroughly until they are glossy and hold their shape when the beater is lifted.
– The oven temperature may have been too high. Make sure to bake the pavlova at a low temperature to allow it to cook slowly and evenly.
– Opening the oven door during baking could cause the pavlova to collapse. Avoid opening the oven until the baking time is complete.
– The pavlova may not have been cooked long enough. If it is still soft in the center, you can leave it in the turned-off oven to cool completely and firm up.
– If you added any leftover egg yolk to the egg whites, it could have prevented them from whipping up properly. Ensure that no yolk is mixed in with the egg whites.